Two weeks have passed since the epic 2017 Solar Eclipse across the United States. Suzanne and I traveled to the Grand Teton National Park outside the town of Jackson in Wyoming to photograph the eclipse. Why did we select this area as our location? First, the centerline of totality would pass directly over the airport outside Jackson. Published eclipse tables predicted totality at this location to last approximately 2 minutes and 10 seconds. Not the longest duration, but certainly enough time to capture several sequences of images during totality. The second reason for selecting the Grand Teton National Park was weather. Again research had shown that the probability of good eclipse weather to be approximately 70% in late August. This was based on historical data and there were no guarantees that we would have good weather on the day of the eclipse; the odds were just as good if not better than other locations in the United States along the path of the eclipse. Photographically, the Grand Tetons is a great place to visit. This area provides several iconic subjects to photograph such as reflections at String Lake, the Moulton Barn, sunrise at Schwabacher Landing, sunset at Oxbow Bend, grizzly bears, bison, and pronghorn. This would certainly keep us busy in the days leading up to and after the eclipse. To avoid the pre and post eclipse travel congestion we planned to arrive several days early and leave several days after the eclipse. There would be plenty of subjects to photograph during our pre and post eclipse time in the area. Our goal was to return home with a diverse portfolio of images.
Photographing an eclipse is unlike any other subject we have photographed. Suzanne and I did extensive research, planning, and practice prior to leaving for our trip. We both felt it imperative to have a plan as to how we would photograph the eclipse and practice executing the plan before leaving so we would have time to uncover and solve any potential problems before eclipse day. In the end, the research and practice paid off. During both the partial and full eclipse phases our equipment worked perfectly as did our technique.
Background Information:
The sun would be approximately 55 degrees above the horizon at totality. We knew that we would not be taking any wide-angle shots during the eclipse. For this eclipse we would use telephoto lenses to capture Bailey’s Beads, diamond ring, and corona. The first step in planning this shoot would be to determine the focal length of the lenses we would use. A 600mm lens will project an image of the sun on a 35mm full frame sensor camera approximately 5.5mm in diameter. This calculation is based on the formula Sun Diameter = (Lens Focal Length)/110. With the sun in the center of the frame and using the dimension of the short side of the full frame sensor of 24mm, the minimum distance from the surface of the sun to the edge of the sensor will be 9.25mm. A 600mm lens should be able to capture the corona out to a distance of approximately 3 solar radii. Therefore, using a 600mm lens would provide a good balance between the size of the sun in the frame and the corona streamers during the full eclipse.
Suzanne would use a zoom lens set at 400mm mounted to a camera with a crop sensor. This camera has a crop factor of 1.5, so the effective size of the sun on the crop sensor will also be 5.5mm in diameter. The weight of this system would be considerably less than the 10 plus pounds of my 600mm lens, camera body, and supporting rail. This lighter weight system would make it easy to track the sun’s movements during the eclipse.
Now that we were set on the lenses to use, we would need to order solar filters sized to fit over the front element of our lenses. These filters are designed specifically for solar photography. They are essentially 16 2/3 stop neutral density filters that block 99.9% of the sun’s energy, avoiding damage to the camera sensor and a person’s eyes when looking at the sun through the camera’s viewfinder. These filters are constructed by mounting a thin sheet of Mylar material to an aluminum ring. The aluminum ring slides over the lens front element. The filter is held in place by felt pads attached to the inside of the aluminum ring. These filters must be placed in front of the lens to work properly. The filter remains in place during all partial eclipse phases and removed only to photograph the full eclipse.
After receiving the filters, we took several images of the sun with the solar filters in place. Histograms were then used to confirm that our metered exposure was correct. We would use this exposure to photograph the partial eclipse phase. Even though the moon would be covering a portion of the sun during the partial eclipse, the exposure would remain constant.
The exposure needed for the partial eclipse was easy; the exposure needed to photograph the full eclipse was more difficult to determine. The range of tones during the full eclipse is well outside the dynamic of the camera sensor. During the full eclipse, proper exposure at the sun’s surface might require a shutter speed of 1/8000 second. The exposure required to capture detail in the corona could be up to one second or longer depending on the distance the corona rays extend from the sun. To aid us in deciding the range of exposures to use to photograph the total eclipse, we made a table listing several different exposure combinations. The aperture and ISO would remain constant; only the shutter speed would change. Using the table, it was clear that Option 2 would yield the best results given the area our lenses would cover. Option 2 would also allow the same set of exposures to be used to capture all detail during the full eclipse and also provide a small margin of error for capturing the corona at the extreme edges of the frame (distance of three solar radii). Our concern at this point was could we dampen the vibration sufficiently to avoid vibration at shutter speeds of 1/8 second and longer producing soft images. This would be worked out as we developed our setups.
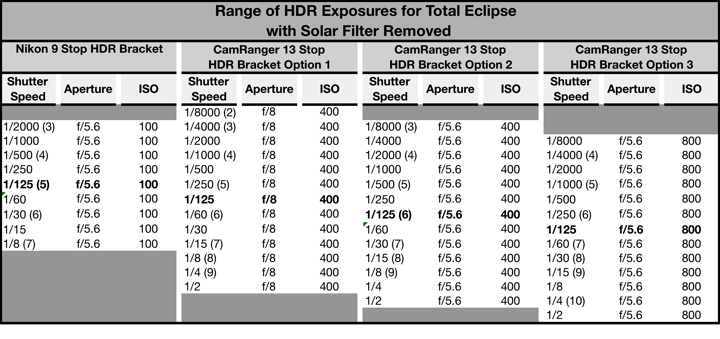 Table 1 – Exposures for Capturing the Full Eclipse
 Table 1 Notes
Information used from Fred Espenak’s website www.mreclipse.com
Setup:
Using the table, we would need to bracket our exposures during the full eclipse over a 13-stop range. This is well beyond the 9-stop bracket range of our cameras. We decided to use a device called a CamRanger that would allow for the needed 13-stop bracket range, sufficient to capture all the detail we wanted during the total eclipse. The CamRanger is designed to control the camera via an app installed on the iPhone. Using the CamRanger app, you can set the camera ISO, shutter speed, aperture, metering pattern, trigger the shutter, activate live view, and also program an HDR sequence, all from an iPhone using the CamRanger app. The live view image can be viewed from the iPhone screen allowing us to set our tripods low to the ground; using the iPhone screen in place camera’s monitor for all focusing and exposure adjustments. With the camera’s monitor not needed, setting our tripods low to the ground would increase stability resulting in a setup less prone to unwanted movement and vibration during longer exposures. The low center of gravity and wide base with the tripod legs extended would help stabilize the setup with the camera and lens tilted at an angle of 60 degrees. Once initially set, we planned to check focus a couple of times during the partial eclipse phase in case there was some focus shift due to heat.
In addition to setting the tripod low to the ground, I would use a long lens bracket to support my heavy camera lens combination. This bracket provides three points of contact, one at the lens hood, one at the tripod collar, and one at the camera body to further dampen any induced camera movement. Suzanne’s lighter weight setup would not require use of a lens bracket. Placing the camera in live view would raise the mirror eliminating the potential of vibration due to mirror movement. Since we did not need a high image capture rate, we used the quiet setting on the camera’s motor drive, hopefully further reducing the chances of inducing vibration during longer exposures. A weighted sack was hung from the center of my tripod to further stabilize the setup. The CamRanger app on our iPhones would be used to trigger our camera shutters remotely. Even though we would have fully charged batteries in our iPhones and CamRangers, we would use a small external USB battery pack to provide backup power to these two devices. Also, there would be fully charged spare camera batteries if needed.
Without a motorized, programmable tracking device, tracking the movement of the sun can be problematic. We would need to track the movement manually by adjusting the head on the tripod. We would need to use a sturdy tripod head that would be easy to adjust the tilt and pan controls and be capable of tilting at a 60 degree angle. The lighter weight of Suzanne’s rig would allow her to use a geared head. The adjustments on the geared head are very precise, so it would be easy for her to track the sun’s movement. My setup, due to its weight, would not allow the use of a geared head. I tried both a gimbal head and a large ball need but was not satisfied with the stability and ease of movement provided by either. I found a panning head with a large platform that was capable of providing the tilt required and would support the weight of my setup when tilted at extreme angles. Movements would not be as precise as those provided by a geared head, but with some practice, I knew that I could make it work. The trick would be to maintain the position of the sun in the center of the frame during the total eclipse phase so as not to cutoff the corona in the image frame. To aid in the center alignment, I placed a very small piece of tape in the center of the screen on my iPhone and used it as a point of reference for centering the sun during totality. Turned out that this worked well. A reference point on the iPhone screen for the 400mm geared head setup was not needed.
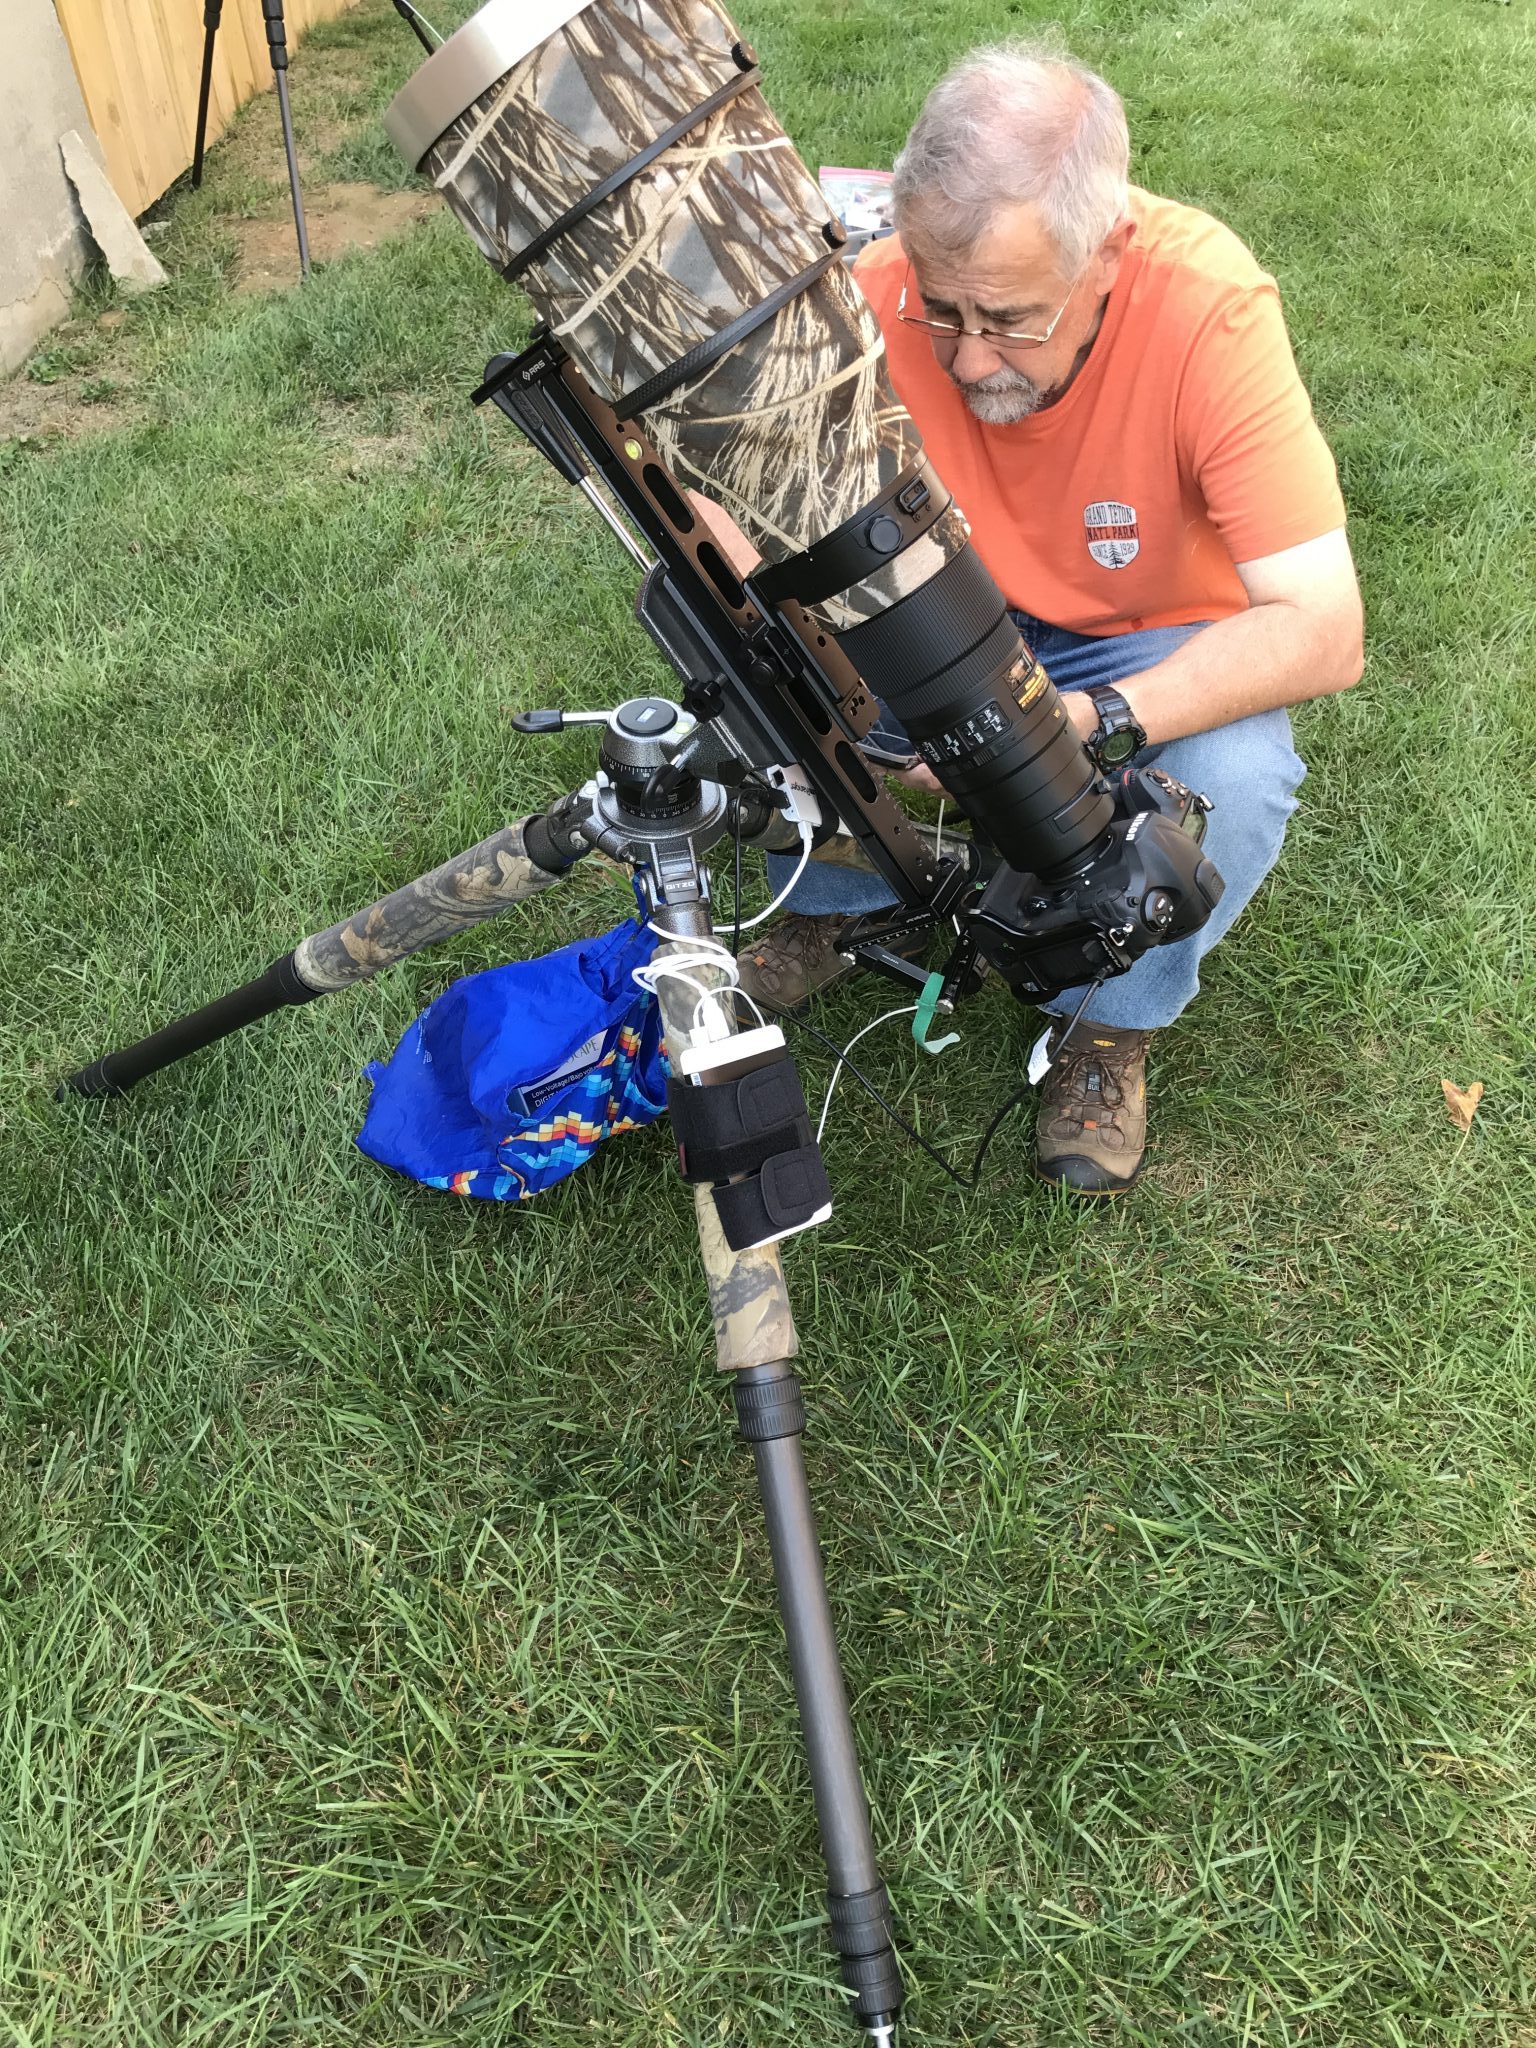
Image #1
600mm Lens Setup
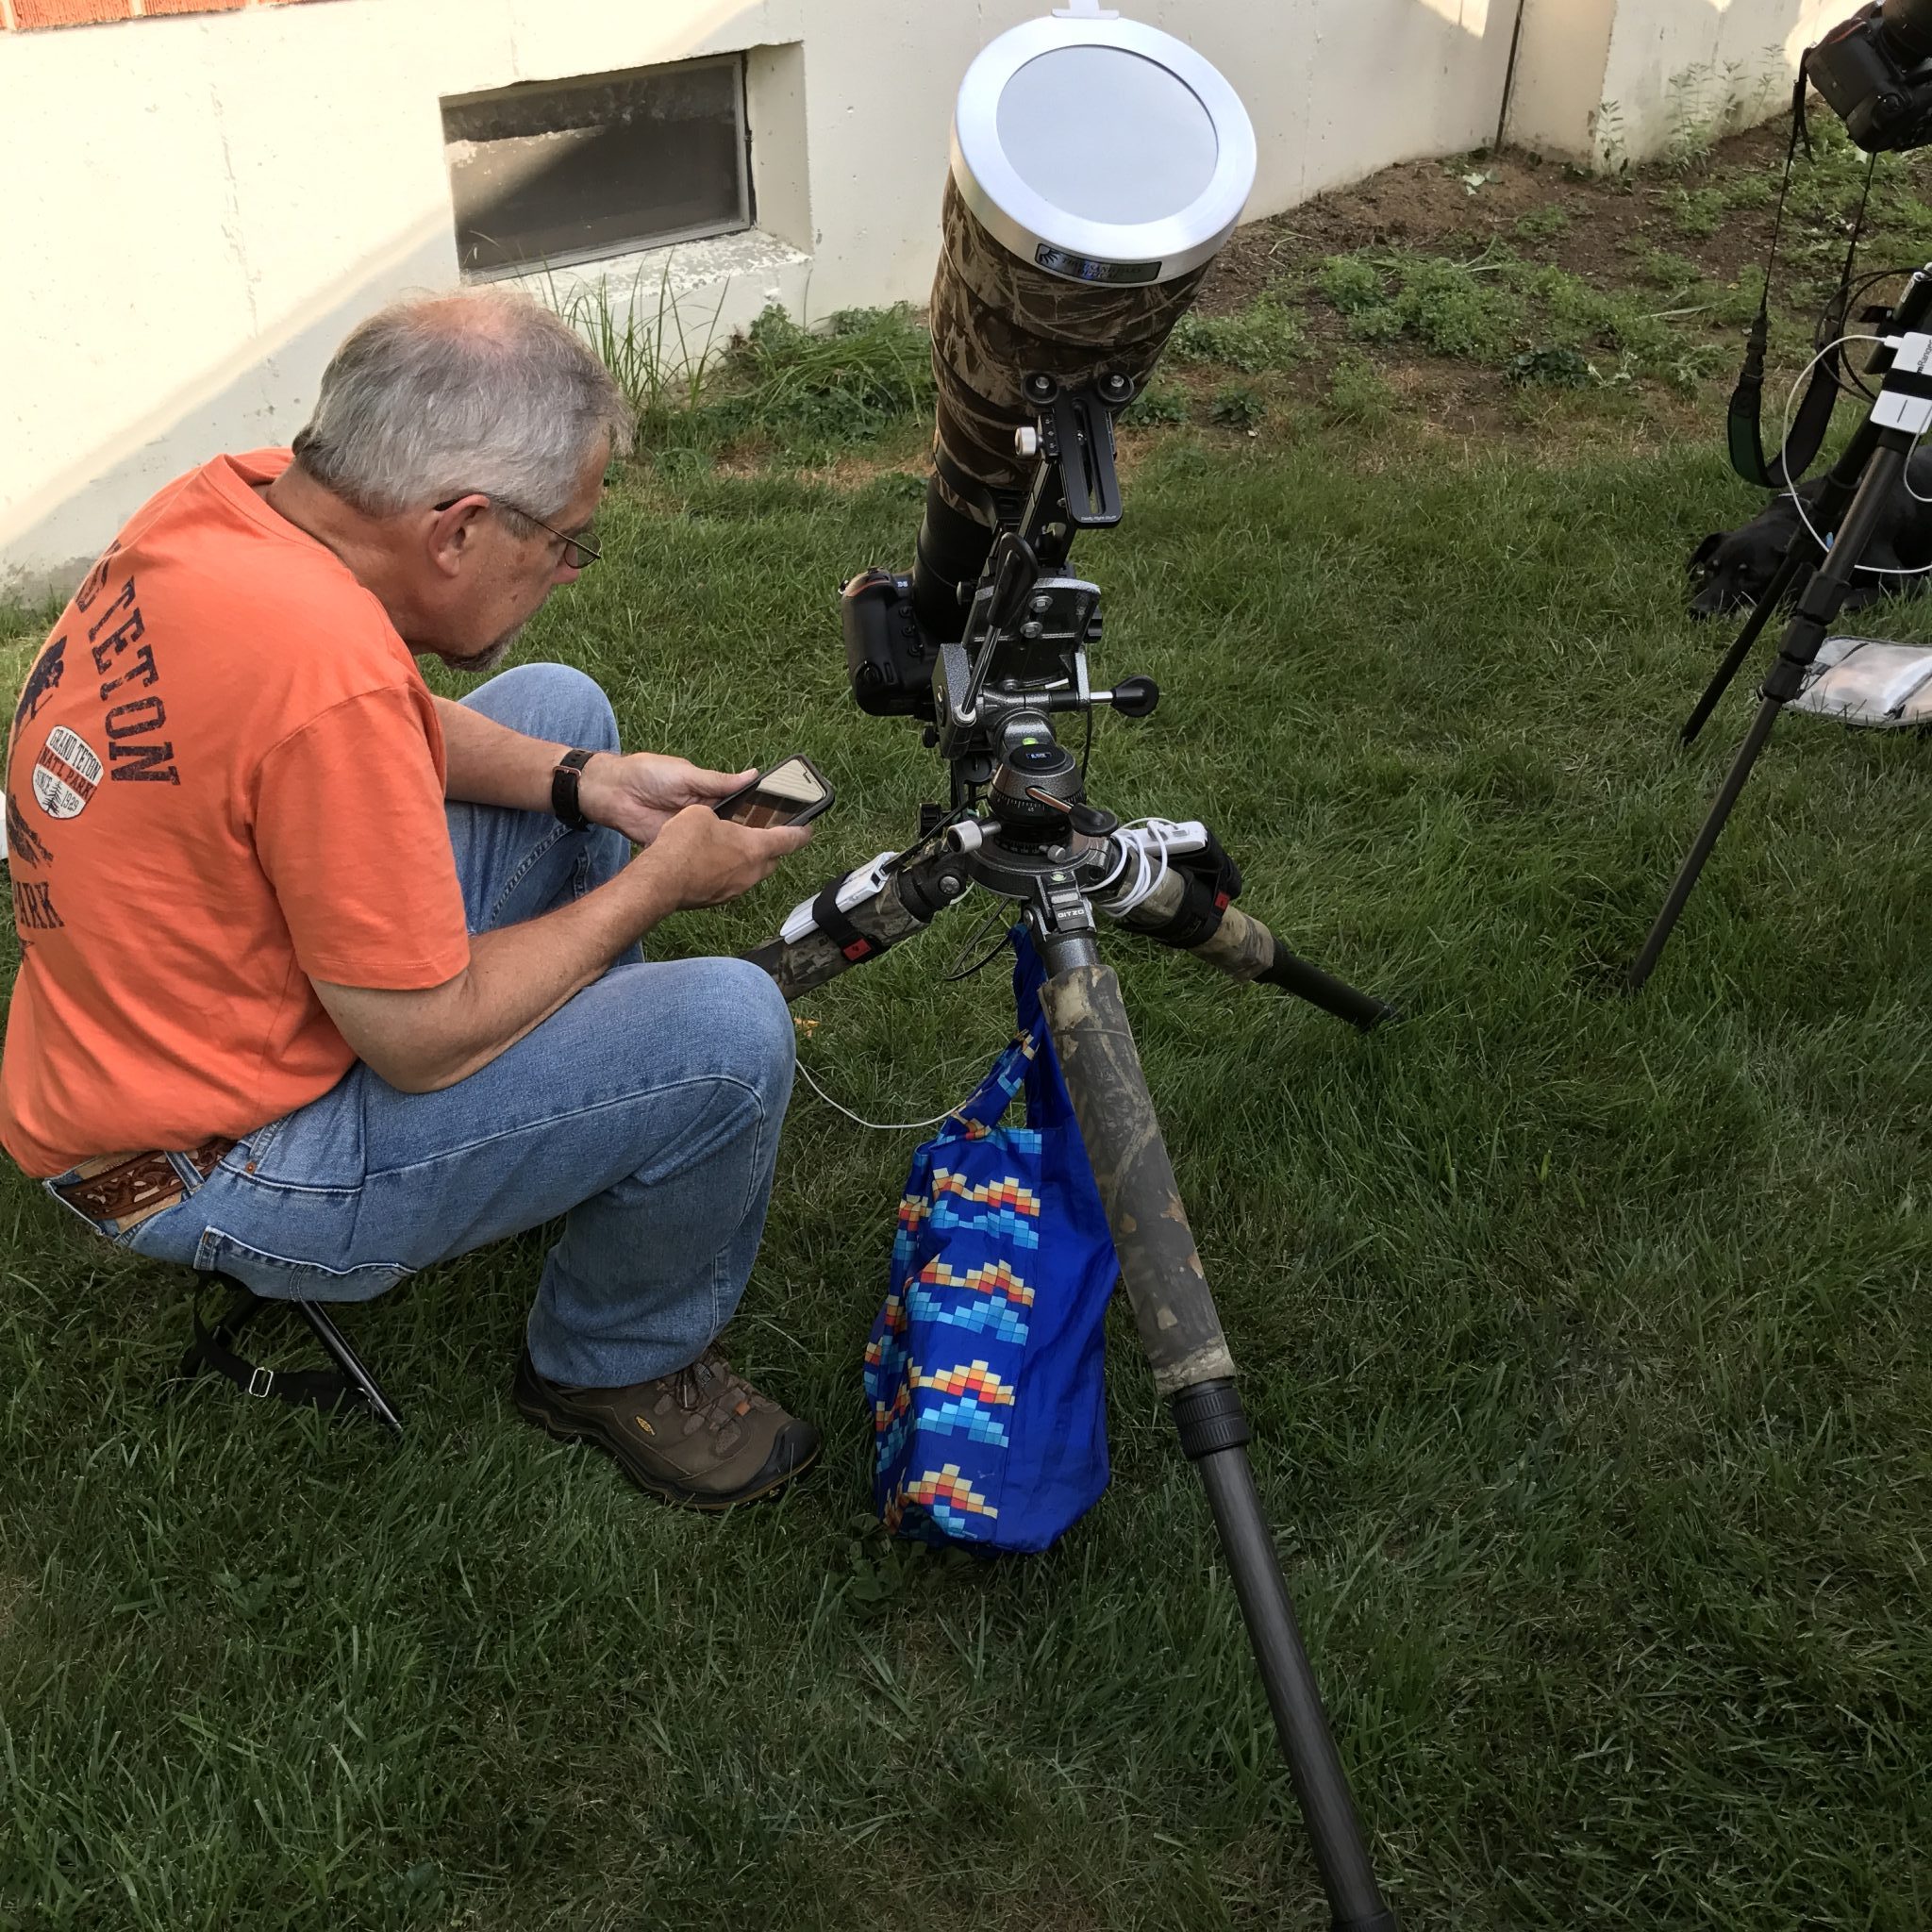
Image #2
600mm Lens Setup
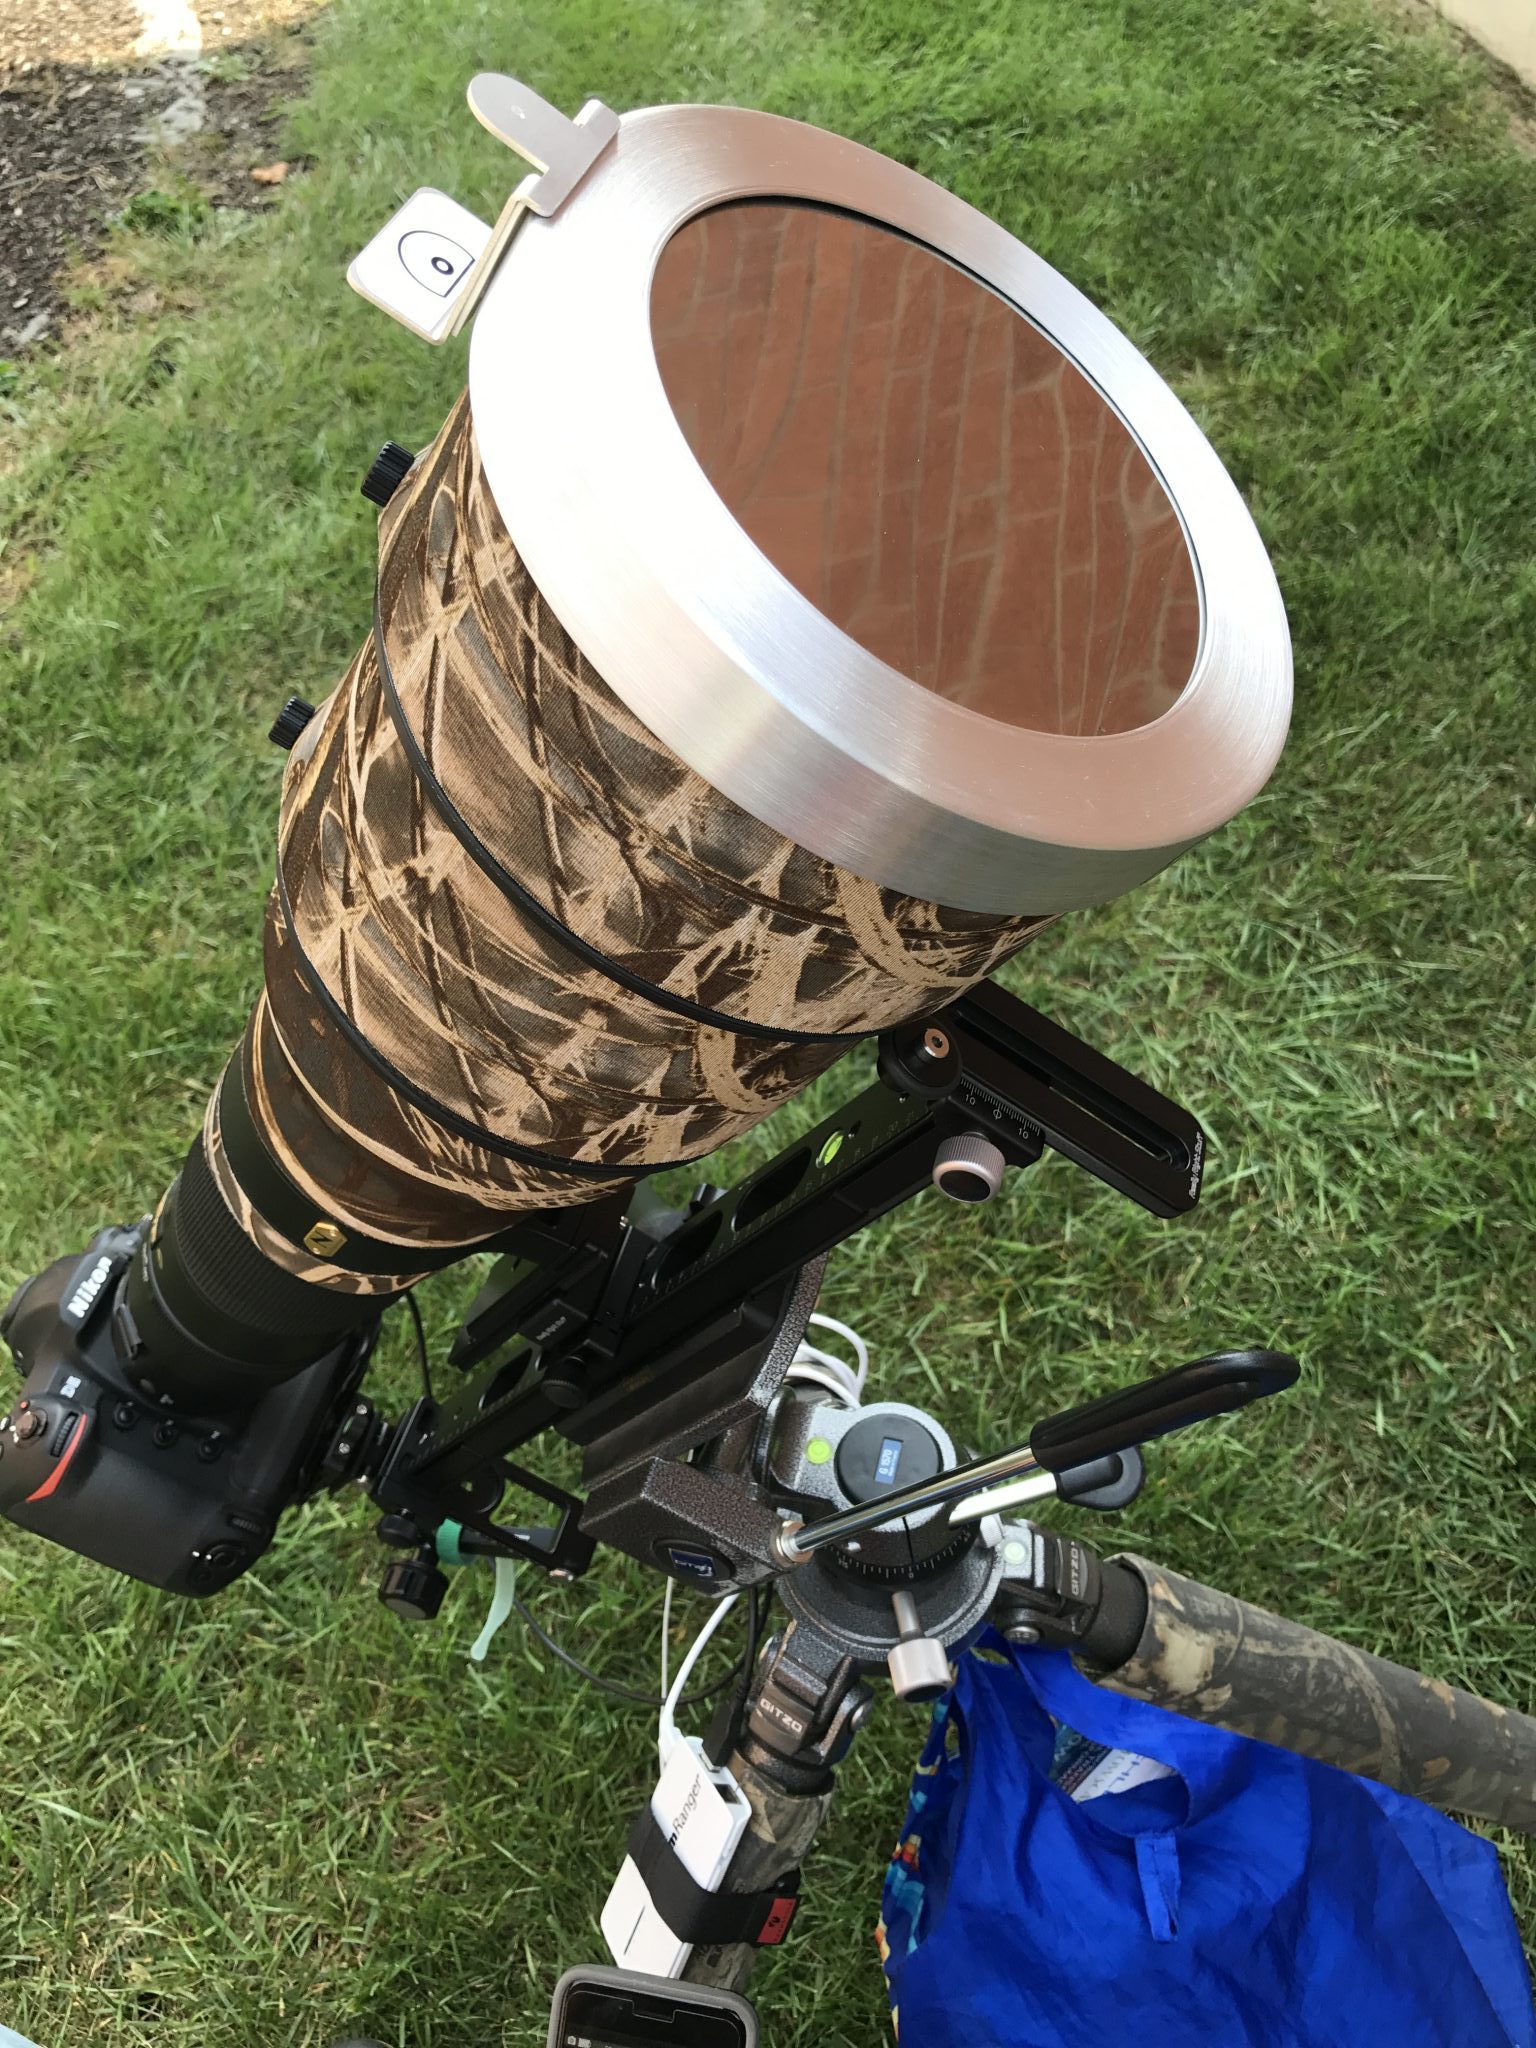
Image #3
600mm Lens Setup
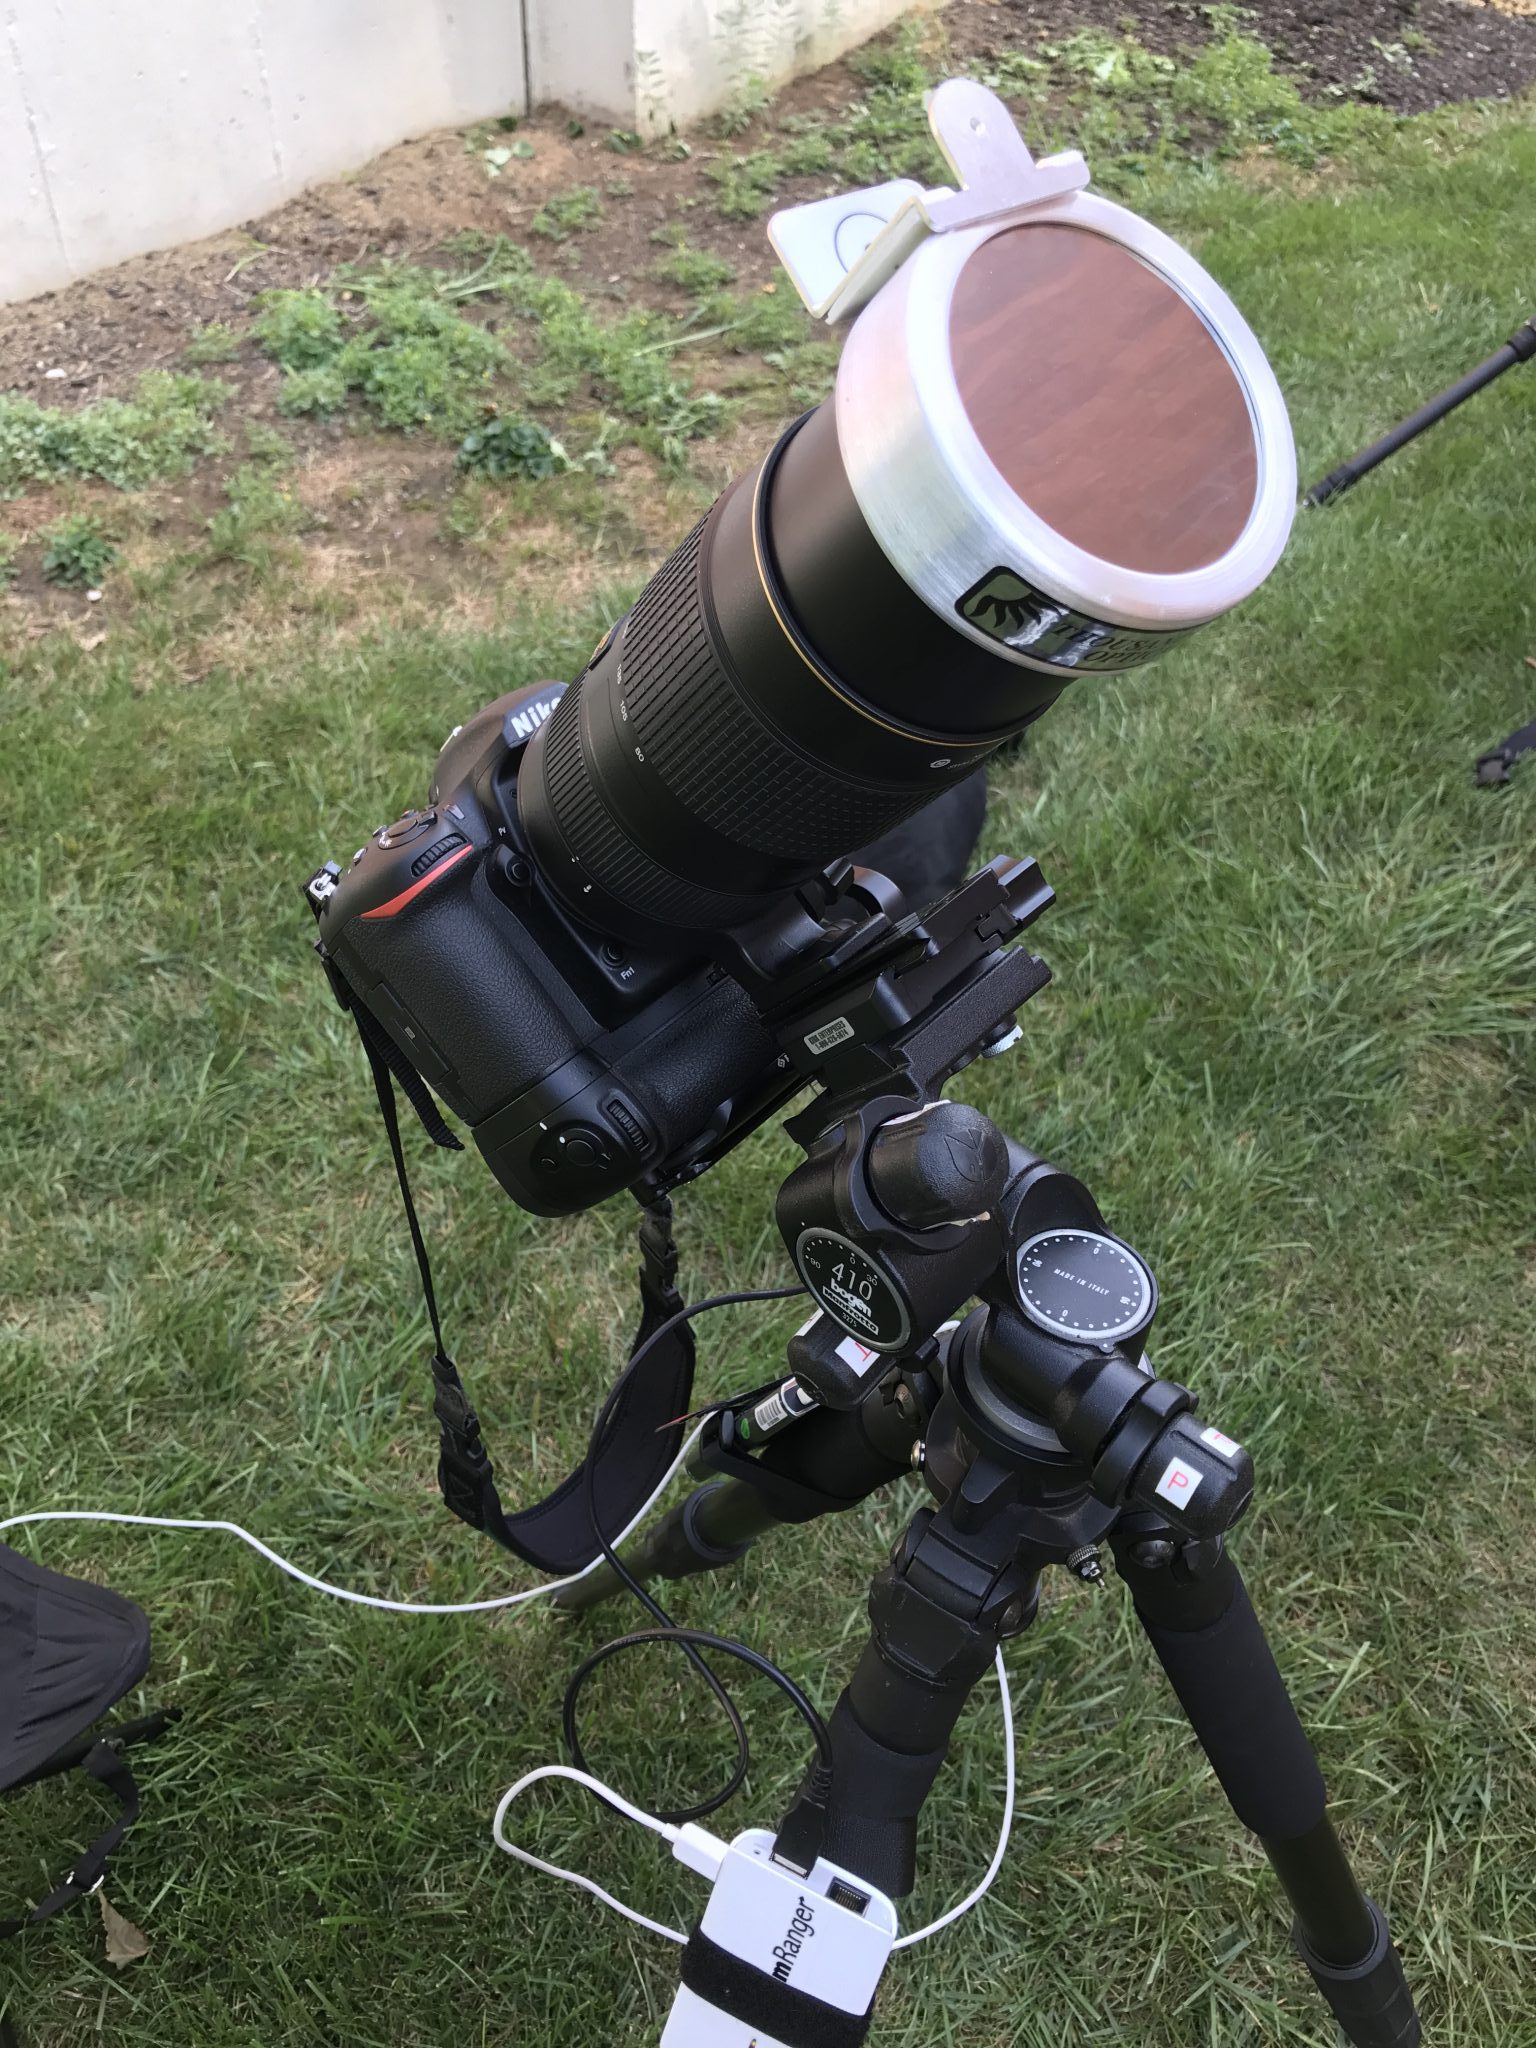
Image #4
400mm Lens Setup
The four images shown above of our setups were take after we completed testing in our backyard.
In the first image, notice that both the CamRanger, closest to me, and the backup battery pack are attached to the tripod legs using Velcro straps. Also, I have positioned myself for easy access to the pan and tilt controls to facilitate tracking the sun and moon during the eclipse. The iPhone can be set on my lap when adjusting the tripod head. During the partial eclipse, we each took a set of images every five minutes. The sun was positioned in the center of the viewfinder before each capture. During the full eclipse, we would reposition the sun and moon to the center of the frame before beginning each 13-stop sequence. Thanks to our practice sessions, we were able to complete 8 sequences during the two-minute duration of the full eclipse.
The second image shows the long telephoto rail used to support the camera and lens. Notice the supporting post supporting the front of the lens and under the lens hood and the articulating arm supporting the rear under the camera body.
In the third image, notice the bracket mounted to the top of the solar filter. This device aided in properly positioning the sun in the frame during the initial setup. This device made locating the sun in the frame very easy.
The final image shows the setup used for the smaller 400mm lens. This setup is similar to the 600mm setup with the exception of the geared head, omission of the lens rail, and smaller tripod. Since this setup was not as prone to vibration, the tripod legs were positioned so that the camera and lens were not as close to the ground allowing for use of a chair rather than stool.
Eclipse Images:
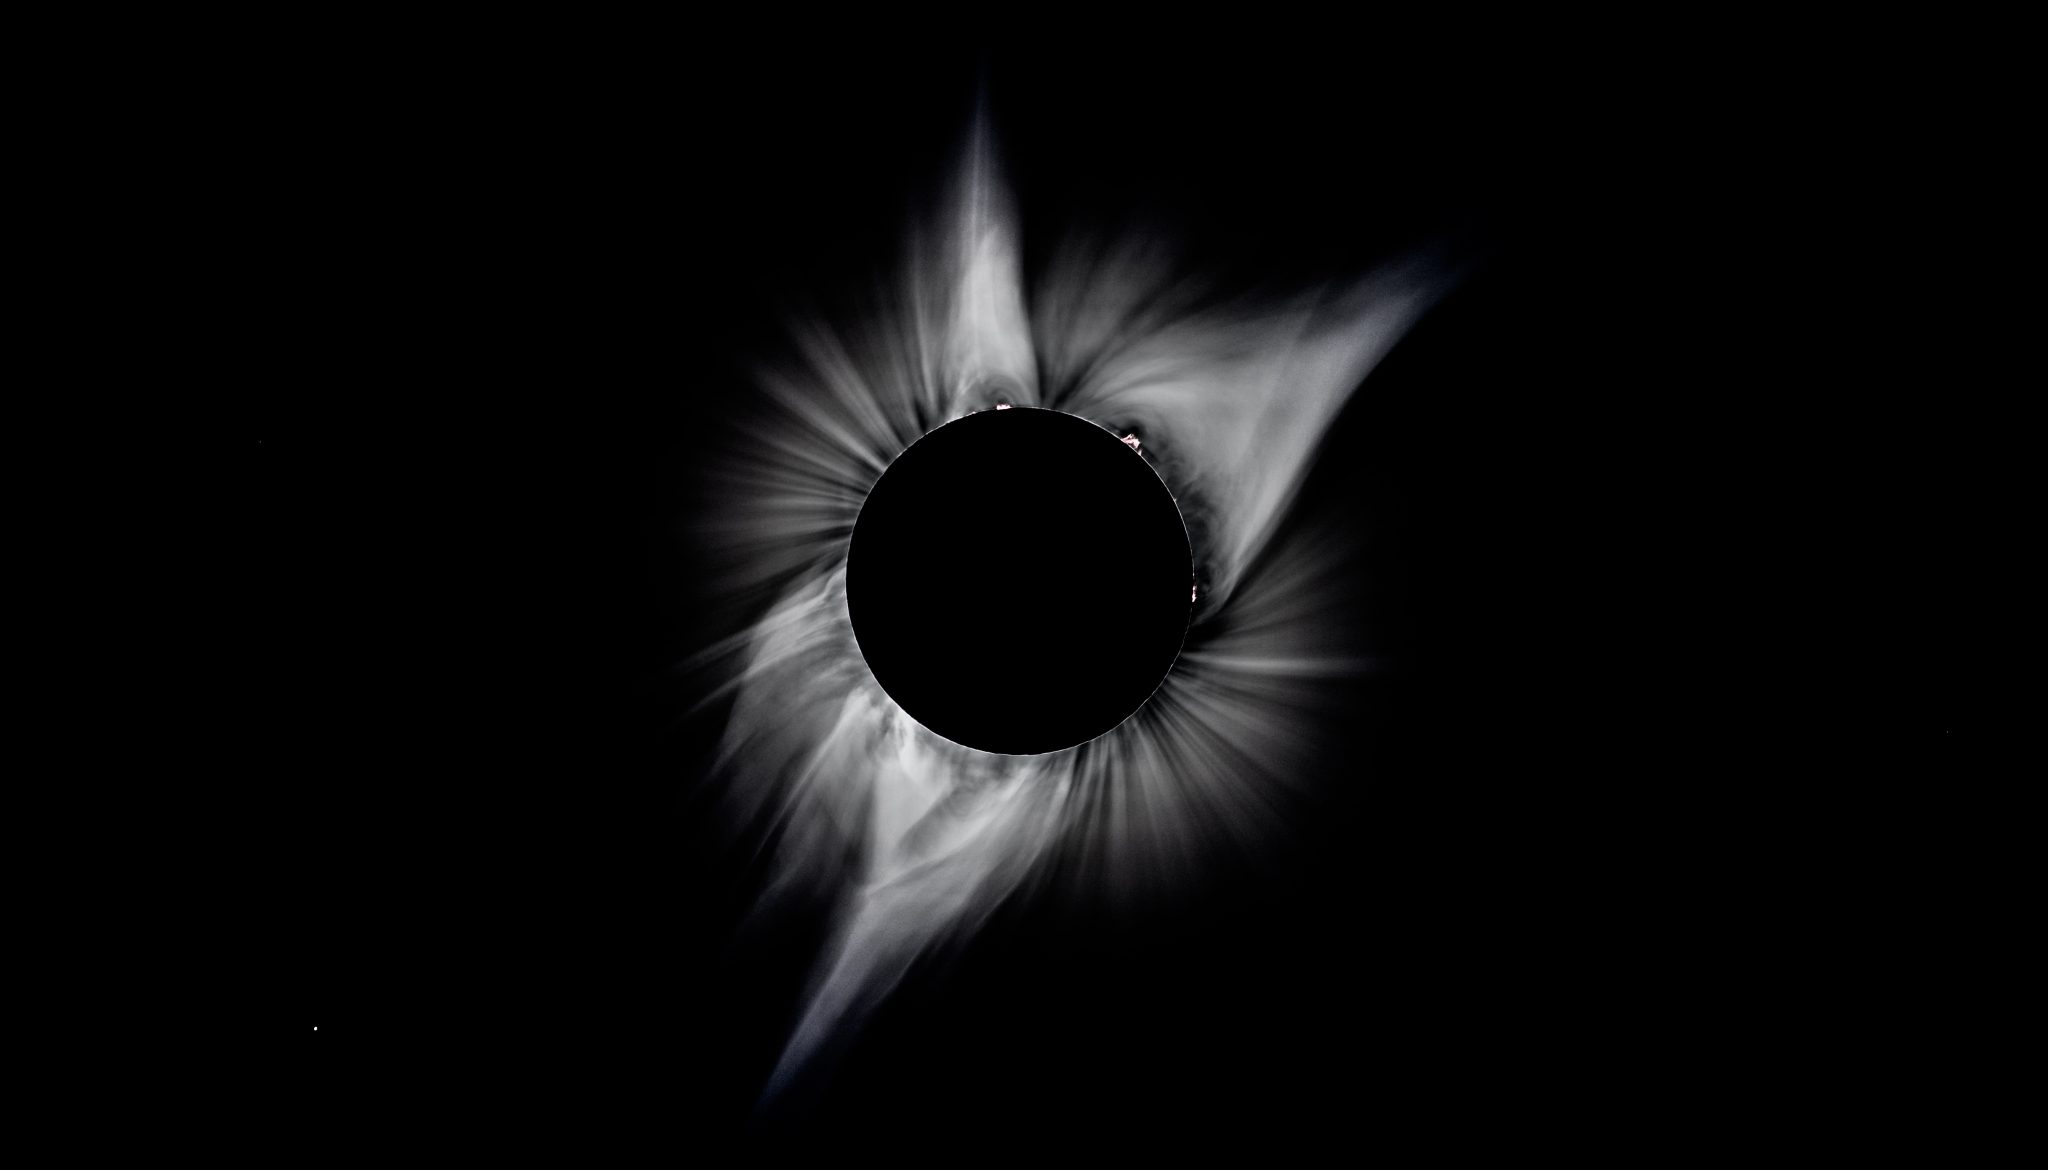
Corona during Full Eclipse
The corona image was produced using Photoshop to blend 13 exposures taken from one of the eight sequences captured during the total eclipse. Note the small white dot in the lower left corner at the 7:00 o’clock position. I believe the to be the planet Mercury. Also note the presence of three solar flares at the 12:00, 1:30, and 3:00 o’clock positions.
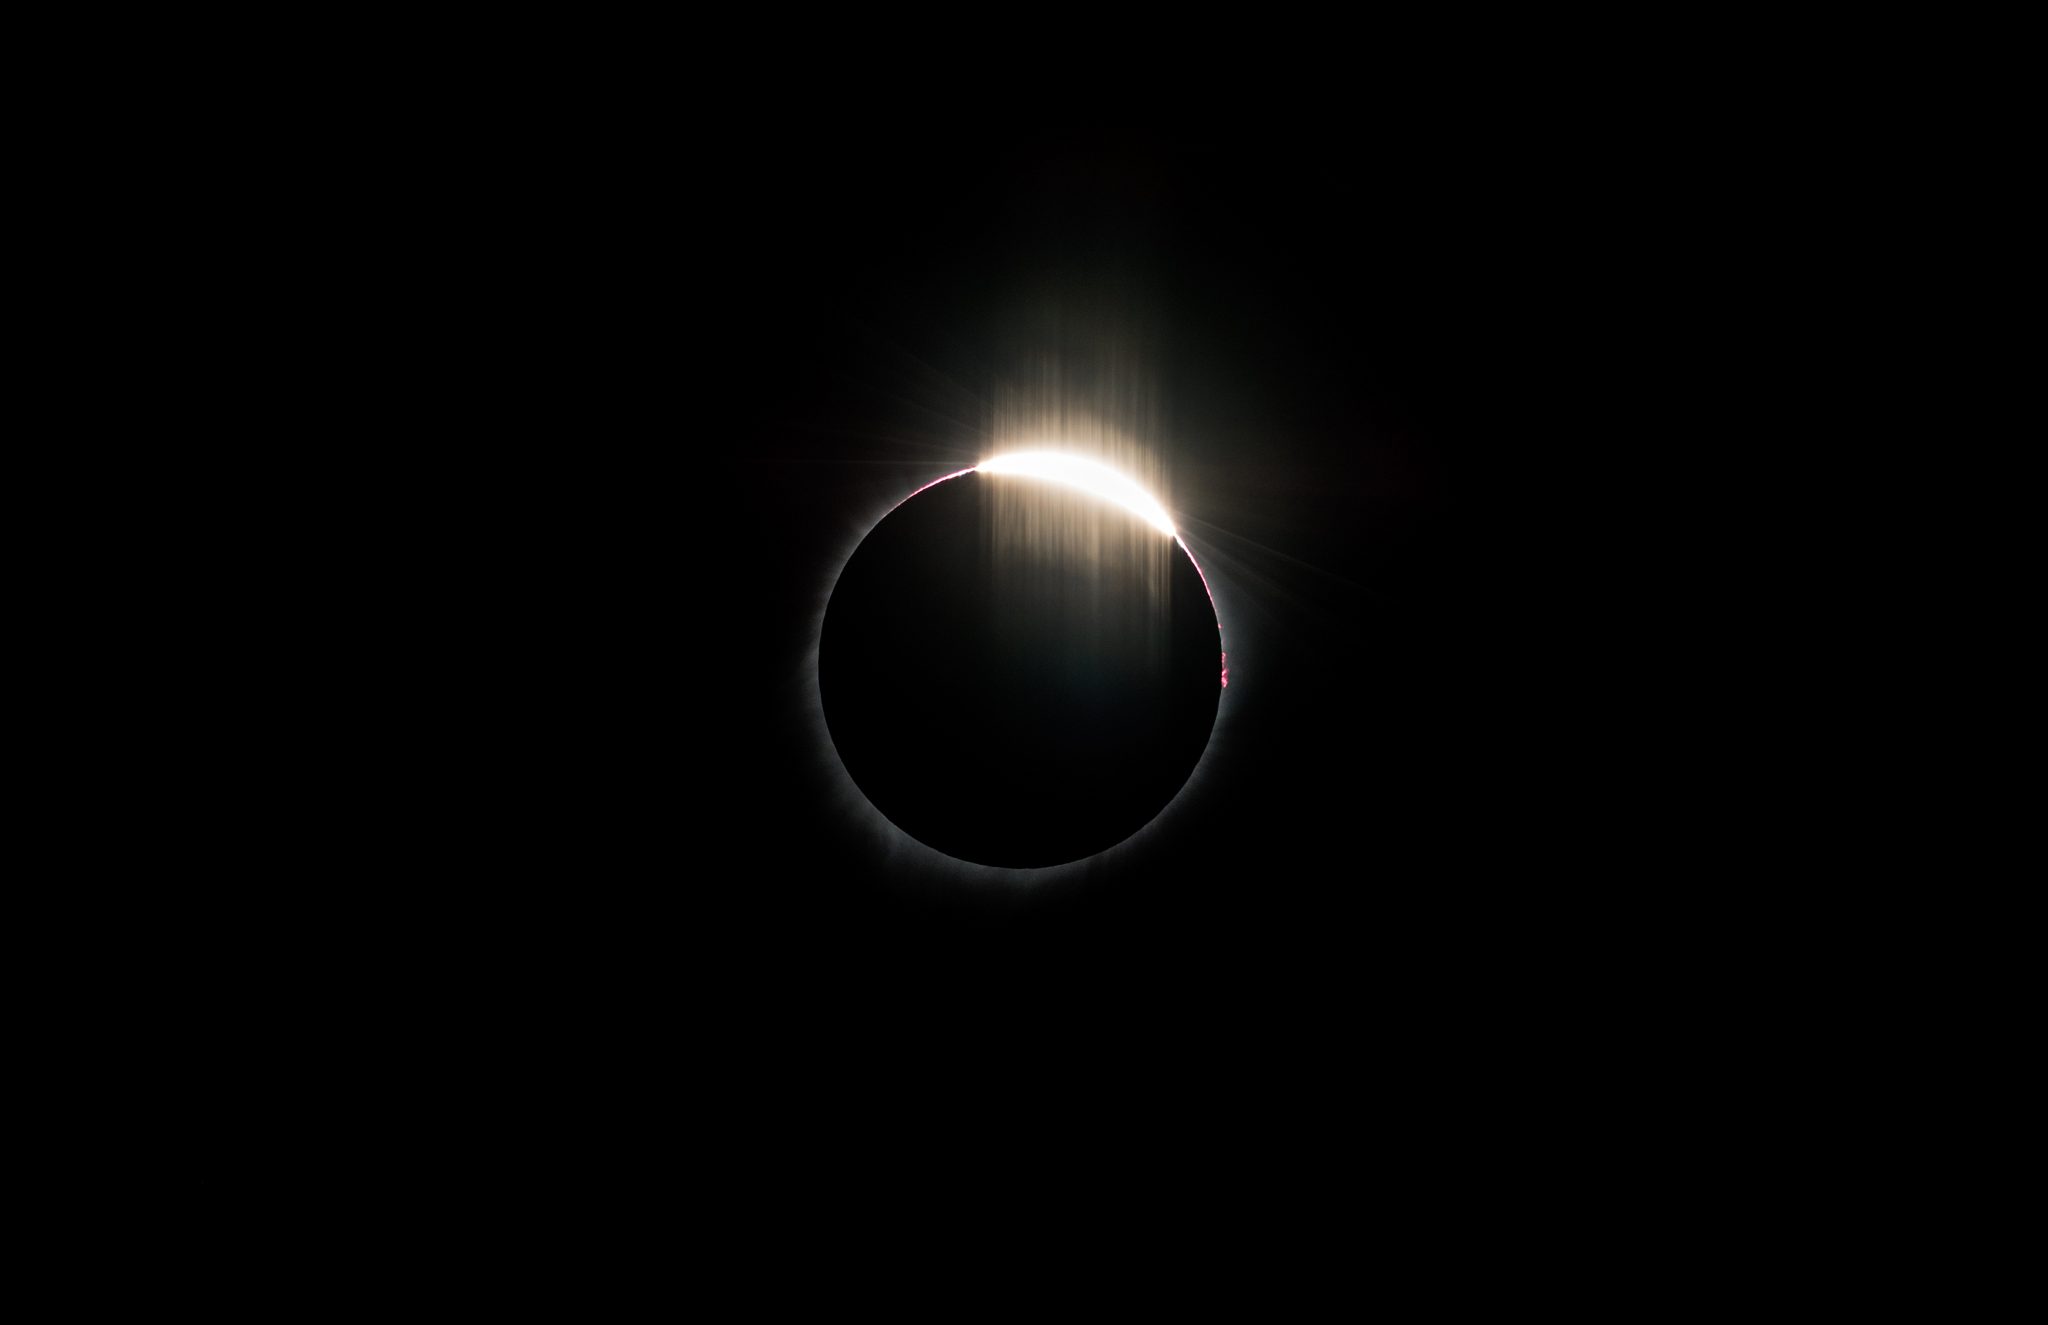
Diamond Ring during Full Eclipse
Notice the presence of star effects around the Diamond Ring.
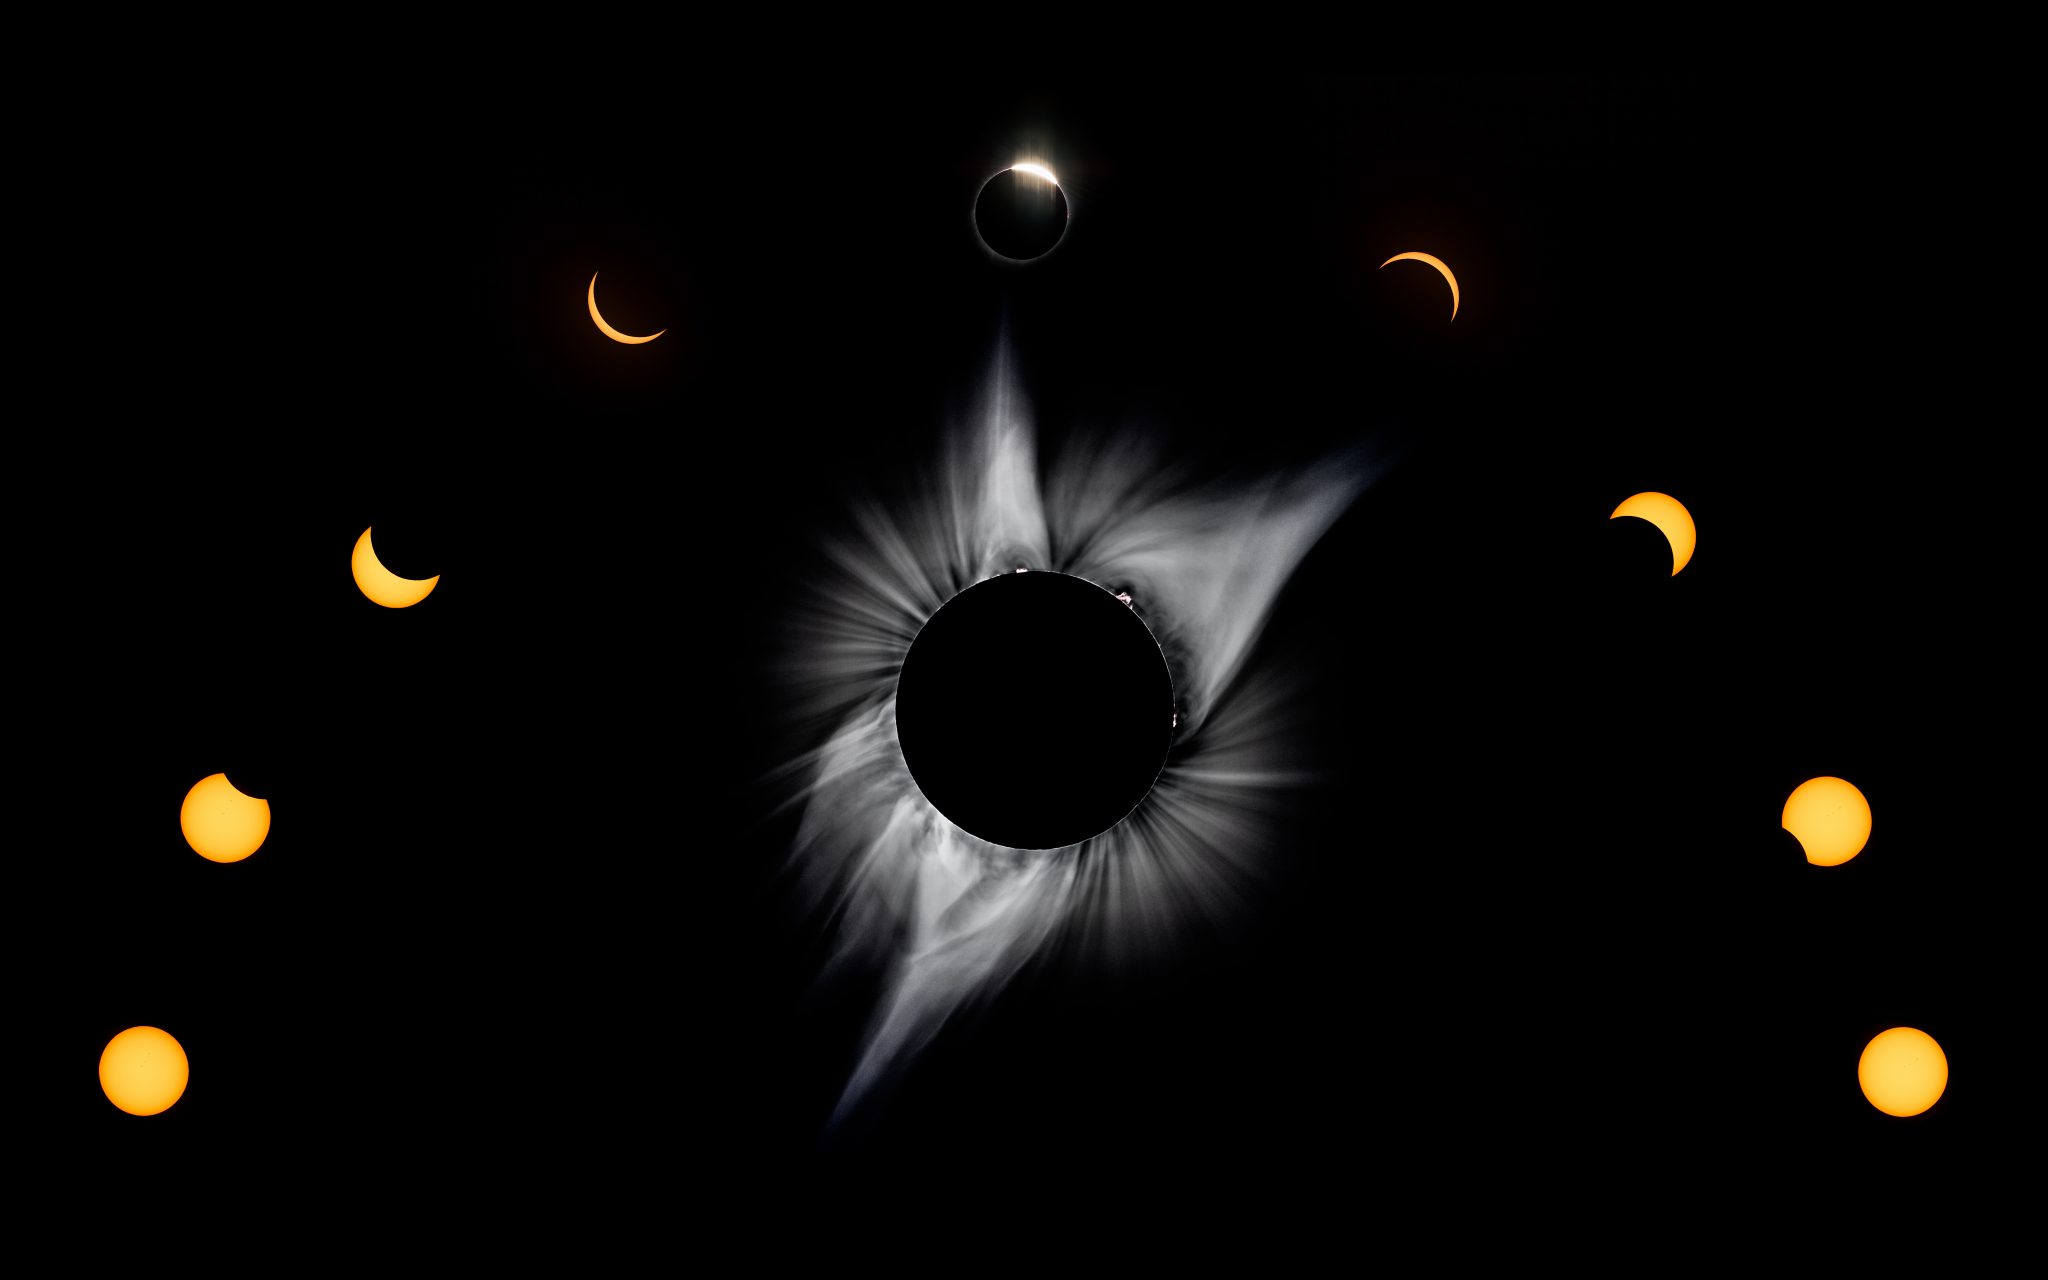
Solar Eclipse Composite Image
Composite image featuring the diamond ring, corona at full eclipse, and several phases of the partial eclipse.
Final Thoughts:
We used information from Fred Espenak’s web site to develop the full eclipse exposure table. There is a considerable amount of solar eclipse information available on the internet. We found Fred’s web site to be the most detailed and reliable. This is without question the most planning and practice that either Suzanne or I have ever done preparing for a shoot. But I felt that all the preparation paid off. The shoot went off without one problem. Luck was with us in that we had perfect weather for the eclipse. Not a cloud in the sky, and reduced haze in the sky the day of the eclipse. At our String Lake location, there was not a crowd of eclipse watchers. In fact, we shared our location with only ten other photographers. Preparation along with great weather and low crowds, made the eclipse that much more enjoyable.